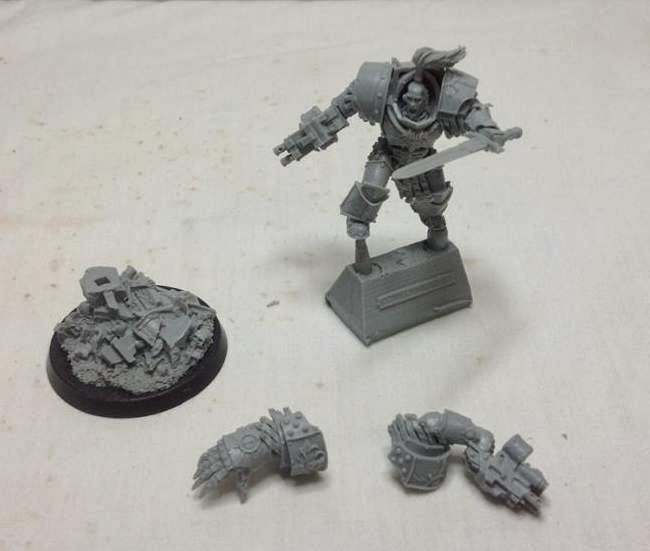
Because of the good cast, there wasn't too much clean up to do. A little trimming with the hobby knife was all to be honest! I left Abaddon on the casting block as this would make it easier to handle him during the paint process without rubbing or wearing the paint off.
I magnetised his arms as he has two weapons options - the power sword which is featured in most of the artwork for Abaddon; and a combi-bolter with an underslung grenade pack. I also crafted a combi-bolter arm to replace his powerfist in the event I wanted to run an all terminator army in 40k. With a power sword and storm bolter look-a-like Abaddon substitutes well as a Belial stand in for a Dark Angels army.... I have since abandoned that idea and have now opted to go with a full 30k load out as opposed to one that ticks both the 30k and 40k boxes.

Abaddon with powerfist and powersword. The head is not glued on and is sitting to pose for the photo.
Abaddon with all weapon options and base, fitted with the makeshift combi-bolter right arm for 40k use.

Undercoats were done with a combination of GW Chaos Black (I know, I know...) and Vallejo Model Air Black Primer. Painting was done with the model in parts glued to tooth picks as you can see in the back ground. The superglue I was using was a pain in the arse and wouldn't set in under 15 seconds, even then it only formed a weak bond. Accelerant is a must for the next project! The toothpicks are stuck into some refrigerant grade foam (it doesn't melt when you hit it with spray cans) so spraying with the airbrush or spray cans is easier. Also pictured is a libby conversion I did to go with Abaddon and his retinue of Justaerin Terminators, I will cover more on him in a later post.
Once the basics had been done, it was on to highlighting the black. This was a bit daunting at first, but with a bit of help from old mate google I had found a few varying techniques and made my own mash of them to suit. I went and got an adjustable pressure valve from Supercheap (a car parts shop in Aus) so I could dial the airbrush right down and get only the minimum amount of spray required. The first layer was done with a mix of Mechanicum Grey / Abaddon Black (lol) in a 1:3 ratio. This was then thinned with Tamiya X20A acrylic thinners then applied to a test model along the general areas of wear and along the edges of the armour plating. You sort of have to let go of the "traditional" way of painting if you haven't done this before and just have a crack at it. The 2nd layer was done with Mechanicum Grey / Abaddon Black again but in a lighter 1:2 ratio. That was as light as I wanted to go as this model was all about the small details and over highlighting it would bring all my work unstuck.

Undercoated model on the left, test model for highlighting with the airbrush on the right.

After doing a couple of the Justaerin Terminators as test models, it was onto Abaddon, who went really well. I am really happy with the way my first lot of airbrush highlight went, and I think it will be the chosen technique for all my 30k models from now on. A couple lessons learnt - less is more. Don't go overboard with excessive highlighting as this will in my opinion detract from the overall look of the model. Thin your highlighting paints more than normal - it makes for a smoother transition between colours and the airbrush will apply it more easily.
That's all for now, in the next post I will cover battle damage, oil washes and detailing. If you have any questions, please don't be afraid ask!
Cheers
Keepy
Abaddon WIP 2
No comments:
Post a Comment